! 주의 : TIL 게시글입니다. 다듬지 않고 올리거나 기록을 통째로 복붙했을 수 있는 뒷고기 포스팅입니다.
지난 글에 이어 이번에는 Cube, Cylinder, Torus
그러니까 직육면체, 원기둥, 도나쓰모양을 만들어봅니다.

핵심은 충돌 가능한 무언가 인 추상클래스 hittable만 잘 구현하는 구상클래스를 만들면 된다는 점입니다
hit()만 잘 정의해주면 되겠습니다.
class hittable {
public:
  virtual ~hittable() = default;
  virtual bool hit(const ray& r, interval ray_t, hit_record& rec) const = 0;
};
Cube
직육면체 큐브를 정하려면 중심점과 축별로 세 가지 길이(width, height, depth) 만 있으면 되겠죠?
point3 center
vec3 size(width, height, depth)
광선을 쐈는데 직육면체 큐브에 닿은 상황을 생각해봅니다.

우리가 지금 물체를 씬에 표현하는, 물체가 씬에 있다고 주장하는 방식인 Implicit Function 렌더링은 자고로 영역전개라고 했습니다.
따라서 큐브의 영역을 주장해야 하고, 그러니 큐브의 8개 점 중 최솟값/최댓값만 모은 box_min, box_max 를 먼저 구합니다.
const vec3 half_size = size / 2;
const point3 box_min = center - half_size;
const point3 box_max = center + half_size;
이제 hit()은 다음과 같이 광선이 영역에 닿았는지 검사합니다:
- 각 축별로,
axis_min및axis_max에 언제 닿는지(t) 봅니다.- 예를 들어, x축에 대해, (또는 )을 만족하는 를 찾습니다.
- 축별로 반복했을 때, 중에서는 가장 큰 것(세 가지 축의 를 모두 만족한)이 진입점이고, 반대로 중에서는 가장 작은 것이 이탈점입니다.
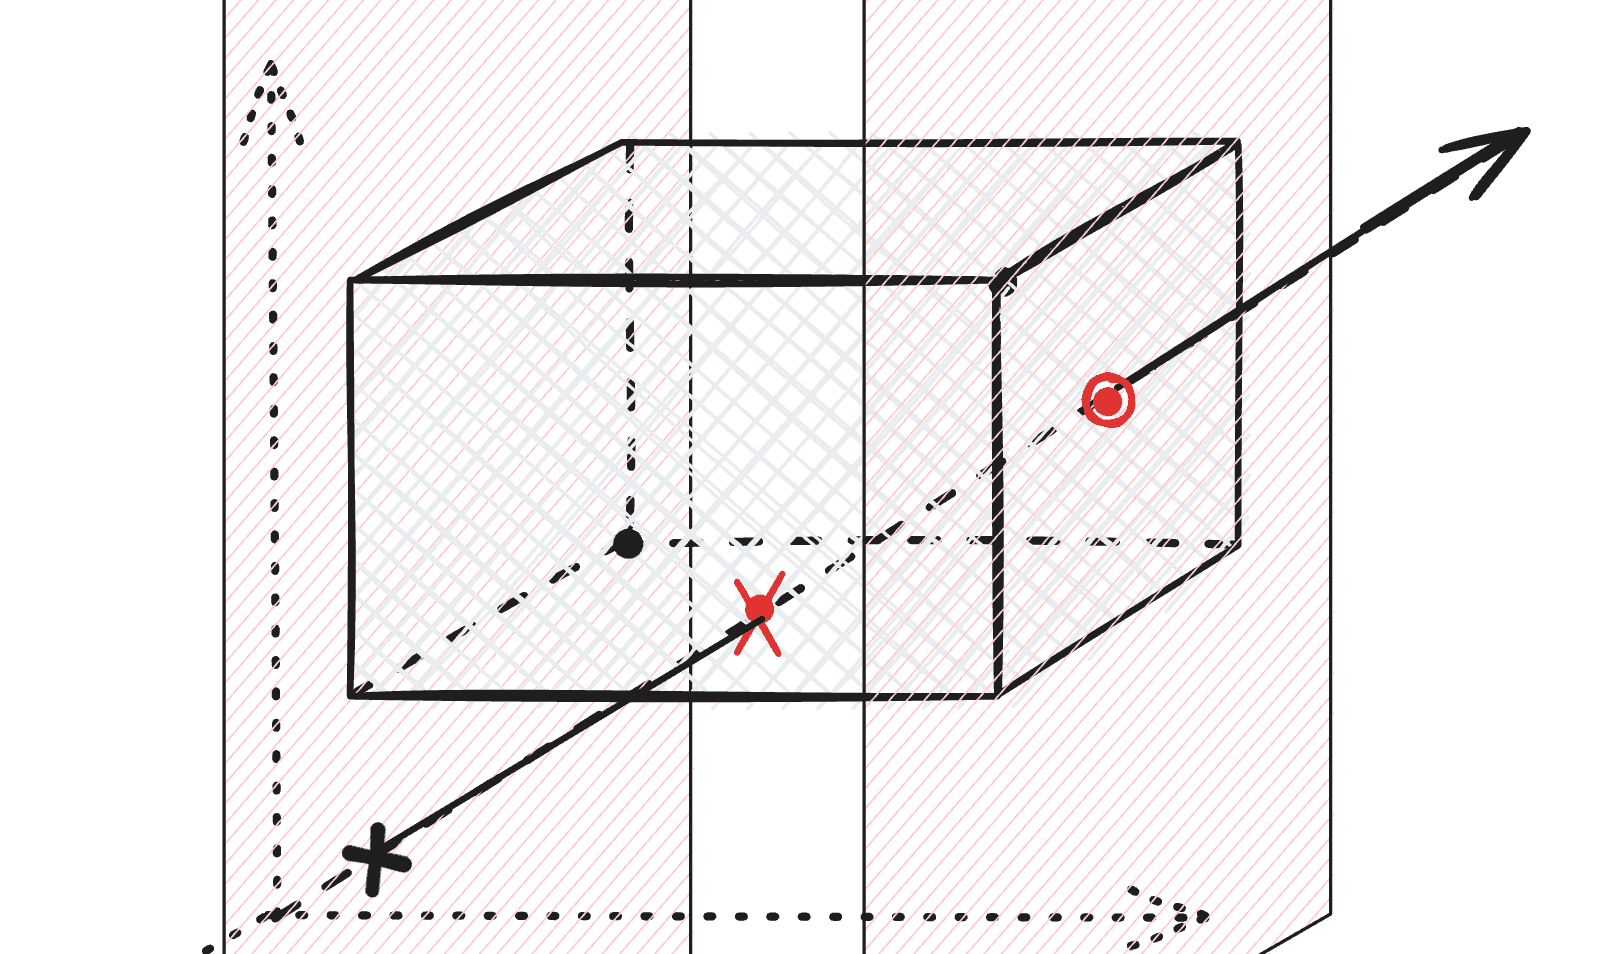
예를들어, x축을 검사하는 과정을 보면
평면을 광선이 뚫는 지점은 좌측하단에 검은색 X를 그어둔 즈음일건데요
이것으로는 아직 을 모두 만족하는 진입점이 아닙니다.
축으로도 평면을 뚫는 지점, 축으로도 평면을 뚫는 지점을 비교해야합니다
코드로는:
double t_enter = -infinity;
double t_exit = infinity;
vec3 enter_normal(0, 0, 0);
vec3 exit_normal(0, 0, 0);
먼저 축별로 검사하는 3회의 반복문을 시작하기 전에,
진입점과 이탈점 그리고 그곳에서의 법선벡터를 담을
t_enter, t_exit, enter_normal, exit_normal을 준비합니다
for (int axis = 0; axis < 3; ++axis) {
  // 현재 축 방향으로의 광선 성분
  double origin = r.origin()[axis];
  double direction = r.direction()[axis];

  // 현재 axis 축으로의 방향성 없음
  if (direction == 0.0) {
    // 범위 밖이면 박스에 못들어간다.
    if (origin < box_min[axis] || origin > box_max[axis])
      return false;

    // 범위 안이면 이 축이 t에 관여하지 않는다.
    continue;
  }

  double t_near = (box_min[axis] - origin) / direction;
  double t_far = (box_max[axis] - origin) / direction;

  vec3 near_normal(0, 0, 0);
  vec3 far_normal(0, 0, 0);
  near_normal[axis] = -1; // 축 방향에 반대인게 near plane 법선
  far_normal[axis] = 1;   // 축 방향에 나란한게 far plane 법선

  // 광선 진행방향이 축의 반대방향이면 box_max보다 box_min을 더 나중에 만난다
  // 따라서 t_near가 t_far보다 크고, 이것을 swap해야 t_near가 작은(진입하는)쪽이 된다
  if (t_near > t_far) {
    std::swap(t_near, t_far);
    std::swap(near_normal, far_normal);
  }

  // 가장 늦게 진입하는 축 면이 박스 진입면(진입점)
  if (t_near > t_enter) {
    t_enter = t_near;
    enter_normal = near_normal;
  }

  // 가장 일찍 이탈하는 축 면이 박스 이탈면(이탈점)
  if (t_far < t_exit) {
    t_exit = t_far;
    exit_normal = far_normal;
  }

  if (t_enter > t_exit)
    return false;
}
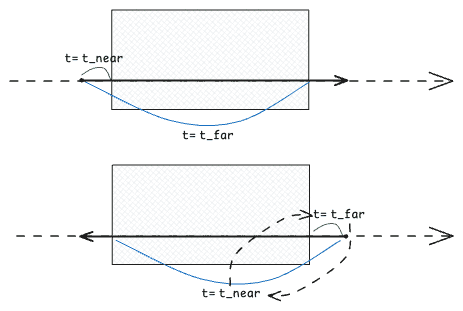
중간에 t_near > t_far인 경우에 주의해줍니다
광선이 축과 반대방향으로 가면 box_min[axis]를 만나는 시점인 t_near가
box_max[axis]를 만나는 시점인 t_far보다 나중이기 때문에 t_near가 더 큰 상황이 나오는데
이를 그대로 두면 t_near가 해당 축에서의 진입점이 아닌 이탈점인 상태가 되어버립니다.
따라서 둘을 교환해줘야겠습니다. (법선벡터도 같이)
참고로 법선벡터는 광선이 들어가는 방향과는 반대고 나가는 방향과는 나란합니다.
법선벡터 또한 가장 나중에 진입/일찍 이탈하는 축에서의 법선 결과가 선택되는 것이구요
정리하자면:
t_enter: 각 축 진입 시점(t)의 최댓값 = 큐브 밖에서 안으로 hit한 시점(t)t_exit: 각 축 이탈 시점(t)의 최솟값 = 큐브 안에서 밖으로 hit한 시점(t)t_enter > t_exit이면 세 조건을 동시에 만족하는t가 없는 것이므로 false
이제 충돌 시 hit_record를 채워주는 코드만 넣어주면 끝납니다.
//... 작은 구를 흩뿌리기

auto material1 = make_shared<dielectric>(1.5);
world.add(make_shared<cube>(point3(0, 1, 0), vec3(1.0, 1.0, 1.5), material1));

auto material2 = make_shared<lambertian>(color(0.4, 0.2, 0.1));
world.add(make_shared<cube>(point3(-4, 1, 2), vec3(0.8, 1.0, 1.2), material2));

auto material3 = make_shared<metal>(color(0.7, 0.6, 0.5), 0.0);
world.add(make_shared<cube>(point3(4, 1, 0), vec3(0.8, 1.5, 1.0), material3));
Cylinder

원기둥은 파라미터로 중심점(center), 뚜껑 반지름(radius), 높이(height) 가 필요합니다
hit은 옆면과 위아래 두 뚜껑을 나눠서 교차 판정 하면 편하구요
어떤 좌표 에 대해, 원기둥(원점 중심, y축으로 높이를 갖는) 내부는:
이런 식입니다
먼저 옆면에 대한 교차 판정입니다
원기둥의 중심인 center 가 주어졌을 때, 아래와 같이 광선을 원기둥 로컬공간에서의 광선 원점 o, 방향 d 를 얻습니다
vec3 o = ray.origin() - center;
vec3 d = ray.direction();
이제 원기둥이 원점에 있는 공간에서의 광선인 이 광선을 원기둥 옆면 방정식에 대입합니다:
전개해서 에 대해 정리하면:
, ,
근데 이렇게만 하면 높이가 무한한 원기둥 인거라, 각 해에 대해 다음의 높이 검사를 수행해줍니다:
double y = o.y() + t*d.y();
if (-height/2 <= y && y <= height / 2) {
  // 이러면 실제 원기둥 옆면에 닿은 후보임
}
그리고 이면 광선이 원기둥 축과 평행한 것이니 옆면 계산은 건너뜁니다(뚜껑에서 처리될걸요)
뚜껑의 경우 간단히, 평면 교차 후 원 내부에 속하는지 확인합니다.
double t = (cap_y - o.y()) / d.y();
double x = o.x() + t * d.x();
double z = o.z() + t * d.z();

if (x * x + z * z <= radius * radius) {
  // 뚜껑에 닿은 후보
}
이 때, d.y() == 0이면 뚜껑과 평행하니 계산을 건너뜁니다(옆면에서 처리될걸요)
코드는
bool hit(const ray& r, interval ray_t, hit_record& rec) const override {
  if (radius <= 0 || height <= 0)
    return false;

  const ray local_ray(r.origin() - center, r.direction());
  double closest_t = ray_t.max;
  vec3 outward_normal;

  const bool hit_side = _hit_side_surface(local_ray, ray_t, closest_t, outward_normal);
  const bool hit_cap =
      _hit_caps(local_ray, interval(ray_t.min, closest_t), closest_t, outward_normal);

  if (!hit_side && !hit_cap)
    return false;

  // ... hit_record
  return true;
}
앞으로도 물체가 원점에 위치하는, 물체 로컬공간에서의 광선 구하기 는 계속 쓸거라 local_ray 유틸이 추가됐습니다
_hit_side_surface(), _hit_cap() 두 내부메서드로 나눠서 진행합니다
bool _hit_side_surface(const ray& local_ray, interval ray_t, double& hit_t,
                        vec3& outward_normal) const {
  const vec3& o = local_ray.origin();
  const vec3& d = local_ray.direction();
  const double half_height = height / 2;
  const double radius_squared = radius * radius;

  // 옆면:  x² + z² = radius²
  const double a = d.x() * d.x() + d.z() * d.z();
  const double half_b = o.x() * d.x() + o.z() * d.z();
  const double c = o.x() * o.x() + o.z() * o.z() - radius_squared;

  // 원기둥축과 평행하지 않은 광선만 옆면검사.
  if (a > 0.0) {
    const double discriminant = half_b * half_b - a * c;
    if (discriminant >= 0.0) {
      const double sqrt_discriminant = std::sqrt(discriminant);
      // 이차방정식의 두 근 (옆면과 만나는 두 t). root[0]이 먼저 만난 시점, root[1]이 나중
      const double roots[2] = {(-half_b - sqrt_discriminant) / a,
                                (-half_b + sqrt_discriminant) / a};

      for (double t : roots) {
        if (!ray_t.surrounds(t))
          continue;

        const vec3 local_hit = o + t * d;

        // 원기둥의 높이를 벗어남
        if (local_hit.y() < -half_height || local_hit.y() > half_height)
          continue;

        hit_t = t;
        outward_normal = vec3(local_hit.x() / radius, 0, local_hit.z() / radius);
        return true;
      }
    }
  }
  return false;
}
옆면 검사는 앞서 말한대로, 안에 속하면서 높이를 벗어나지 않는지 봅니다.
bool _hit_caps(const ray& local_ray, interval ray_t, double& hit_t,
                vec3& outward_normal) const {
  const vec3& o = local_ray.origin();
  const vec3& d = local_ray.direction();
  const double half_height = height / 2;
  const double radius_squared = radius * radius;
  bool hit_anything = false;

  // 뚜껑과 평행하지 않은 광선만 검사
  if (d.y() != 0.0) {
    // 아래뚜껑(-1), 윗뚜껑(1)
    for (int sign : {-1, 1}) {
      const double cap_y = sign * half_height;  // 아래/위 뚜껑 높이
      const double t = (cap_y - o.y()) / d.y(); // 뚜껑 평면과 만나는 곳
      if (!ray_t.surrounds(t))
        continue;

      const vec3 local_hit = o + t * d;
      const double distance_squared =
          local_hit.x() * local_hit.x() + local_hit.z() * local_hit.z();

      // 평면과 만난 점이 뚜껑의 원 안에 있어야 함
      if (distance_squared > radius_squared)
        continue;

      hit_t = t;
      outward_normal = vec3(0, sign, 0);
      ray_t.max = t;
      hit_anything = true;
    }
  }

  return hit_anything;
}
뚜껑 검사도, 위에서 언급한대로, 윗뚜껑/아래뚜껑 평면과 광선의 교차점이 중심으로부터 radius 반경 내에 있는지 검사합니다.

Torus
y축을 회전축으로 하는 도넛인 Torus의 파라미터는
center: 도넛 전체의 중심(구멍의 중심)major_radius R: 회전축으로부터 튜브 중심선까지의 거리minor_radius r: 튜브 자체의 반지름- 일반적인, 구멍있는 도나쓰를 가정하여
R > r > 0이라고 간주합니다. - 바깥 반지름은
R+r이고, 구멍 반지름은R-r입니다. 전체 높이는2r.

출처: 위키피디아 - 원환면
Torus의 방정식은 원의 방정식에서 출발합니다.
Torus 중심이 원점일 때, Torus 위의 어떤 지점의 y축까지 수평거리 는
이렇게 두면 튜브 중심선은 , 인 곳에 위치합니다.
이 때 튜브 표면까지의 거리가 이므로:
원의 방정식에서 가로를 , 세로를 로 뒀다고 생각하면 됩니다.
제곱근을 제거하고 정리하면:
이제 여기에 광선 를 대입하여 교차점을 얻을 수 있는데
어쩌구 저쩌구 계산하면 아무튼 이런식의 4차식으로 정리될것으로 보입니다
이처럼 Torus를 뚫고 지나가는 광선은 교차점을 최대 4개가질 수 있습니다.
4차식 푸는 것에 대해서는 아래에서 살펴보고,
충돌점 p를 찾았을 때 그곳에서의 법선벡터는, p에서 가장 가까운 튜브 중심선 위의 점 q를 잇는 벡터를 찾으면 됩니다.
double rho = std::sqrt(p.x() * p.x() + p.z() * p.z());

vec3 q(R * p.x() / rho, 0, R * p.z() / rho);

vec3 outward_normal = unit_vector(p - q);
4차방정식 해 구하기
몇 가지 방법이 있는 것 같은데 크게:
- 2차방정식 근의 공식처럼 4차방정식도 (복잡하지만) 푸는 공식이 있고 이를 Ferrari's solution이라고 한다고 하네요
- 반복법으로 수치적으로 근사하여 해를 찾는 법도 있구요
저는 운좋게 Don Cross, Fundamentals of Ray Tracing라는 자료에서 Ferrari 방식의 4차방정식 Solver를 구현한 코드를 발견해서
이것을 참고해 아래와 같이 쓸 수 있게 가져왔습니다
#include "algebra.h"

auto roots = algebra::solve_quartic_equation(A, B, C, D, E);
A*t⁴ + B*t³ + C*t² + D*t + E = 0을 푸는것이고- 반환형은
std::vector<double>, 실수 근을 오름차순으로 반환합니다. - 중근은 허용오차
1e-8기준으로 합치고 - 실수 근이 없으면 빈 벡터가 반환되고, 음수 근까지 포함하므로
ray_t검사는 별도로 진행해야 합니다.
저도 Ferrari 공식이 뭔지 어떻게 구현된지도 모릅니다.
대신에 그나마 잘 작동은 하는지 몇 개 단위테스트라도 넣어서 확인했을 뿐이구요
예를들어:
| 번호 | 테스트 방정식 | 기대하는 실수해 |
|---|---|---|
| 1 | 1, 2, 3, 4 | |
| () | ||
| 2 | −2, −1, 3, 4 | |
| 3 | −1, 1 , 나머지 두 해는 복소수 | |
| 4 | 실수해 없음 | |
| 5 | 약 −2.0000000166666667, −0.9999999833333333, 1.0000000166666667, 1.9999999833333333 | |
| 6 | 실수해 없음 |
더 많이 있지만 이런 식입니다. 6번 항목은 실제로 렌더링하다가 수치 오류(divide by 0)가 나온 케이스를 집어넣었습니다.
이제 교차점을 찾는 코드를 작성할 수 있습니다:
bool _find_intersection(const ray& local_ray, interval ray_t, double& hit_t) const {
  const vec3& o = local_ray.origin();
  const vec3& d = local_ray.direction();

  const double R_squared = major_radius * major_radius;
  const double r_squared = minor_radius * minor_radius;

  // p⋅p + R² - r² = a*t² + b*t + c
  const double a = dot(d, d);
  const double b = 2 * dot(o, d);
  const double c = dot(o, o) + R_squared - r_squared;

  if (a == 0.0)
    return false;

  // rho² = p.x² + p.z² = u*t² + v*t + w
  const double u = d.x() * d.x() + d.z() * d.z();
  const double v = 2 * (o.x() * d.x() + o.z() * d.z());
  const double w = o.x() * o.x() + o.z() * o.z();

  // (x² + y² + z² + R² - r²)² - 4R²(x² + z²) = 0
  // => (a*t² + b*t + c)² - 4R²(u*t² + v*t + w) = 0
  const double A = a * a;
  const double B = 2 * a * b;
  const double C = b * b + 2 * a * c - 4 * R_squared * u;
  const double D = 2 * b * c - 4 * R_squared * v;
  const double E = c * c - 4 * R_squared * w;

  const auto roots = algebra::solve_quartic_equation(A, B, C, D, E);

  // 오름차순으로 반환되므로 첫 유효한 근이 가장 가까운 t임
  for (double t : roots) {
    if (ray_t.surrounds(t)) {
      hit_t = t;
      return true;
    }
  }

  return false;
}
이것을 이용하여 torus.hit()을 작성합니다.
bool hit(const ray& r, interval ray_t, hit_record& rec) const override {
  // 구멍이 있는 일반적인 torus만 다룬다.
  if (!(major_radius > minor_radius && minor_radius > 0))
    return false;

  // 1. 월드 공간 광선을 오브젝트 공간으로
  const ray local_ray(r.origin() - center, r.direction());

  // 2. 토러스 교차 계산 => 허용 범위 안의 가장 가까운 교차점 탐색
  double hit_t;
  if (!_find_intersection(local_ray, ray_t, hit_t))
    return false;

  // 3. 법선 계산 및 월드공간 기준 충돌 정보 저장
  const point3 p = local_ray.at(hit_t);
  const double radial_distance = std::sqrt(p.x() * p.x() + p.z() * p.z()); // rho
  const point3 tube_center(major_radius * p.x() / radial_distance, 0,
                            major_radius * p.z() / radial_distance);

  const vec3 outward_normal = unit_vector(p - tube_center);

  // ... hit_record

  return true;
}
이제 Torus가 잘 구현됐는지 확인해봅니다.
auto material4 = make_shared<dielectric>(1.5, color(1.0, 0.5, 1.5));
world.add(make_shared<torus>(point3(0, 1, 0), 1.0, 0.25, material4));

auto material5 = make_shared<lambertian>(color(0.4, 0.2, 0.1));
world.add(make_shared<torus>(point3(-4, 1, 0), 1.0, 0.75, material5));

auto material6 = make_shared<metal>(color(0.7, 0.6, 0.5), 0.0);
world.add(make_shared<torus>(point3(4, 1, 0), 1.0, 0.5, material6));
4가지 모양과 3가지 재질이 되었으니 모두 한 눈에 볼 수 있는 장면을 한번 만들어보면

회전/축소확대 변환 구현하기
지금까지는 저 편할대로 구현했는데요
큐브는 면들이 다 축을 따라서 형성되고.. 원기둥은 항상 높이축이 y축이고.. 토러스도 항상 뚫린축이 y축이고..
구는 회전한다는 개념이 별로 없으니까 몰랐는데, 여러 모양들을 만들고 나니까 회전을 시키고 싶은 충동이 듭니다.
회전시키는 김에 축소확대 변환도 있으면 재밌을 것 같구요
세 가지가 필요할 것 같아요:
transformed_hittable래퍼클래스- 작은
transform타입 quaternion으로 회전을 표현하기
이것으로 사실상 **오브젝트 공간(Object Space)**을 구현하는 것처럼 됩니다.
1. 변환 가능한 hittable 래퍼클래스
기존 물체들은 다 hittable을 구현하는 클래스였는데요
hittable 자체를 변환 가능이라고 하기보단, 래퍼클래스를 두는게 나아보입니다.
class transformed_hittable : public hittable {
  shared_ptr<hittable> object;
  transform local_to_parent;

public:
  bool hit(const ray& r, interval ray_t, hit_record& rec) const override;
}
래퍼클래스를 두는 이유는
hittable을 직접 수정하려면 모든 도형의hit()에서 변환을 적용해야 하고, 이것을 추상클래스 단위로 강제하려면hit_local()같은 인터페이스를 추가해야할 것 같아요hittable_list도 감쌀 수 있어 여러 도형을 함께 회전하거나 스케일할 수도 있습니다.
2. transform 클래스
translation, rotation, scale만 저장합니다.
class transform {
  vec3 translation;        // 기본값 (0,0,0)
  quaternion rotation;     // 기본값 단위 쿼터니언
  vec3 scale;              // 기본값 (1,1,1)

public:
  point3 apply_point(const point3&) const;
  vec3 apply_vector(const vec3&) const;
  vec3 apply_normal(const vec3&) const;

  point3 inverse_point(const point3&) const;
  vec3 inverse_vector(const vec3&) const;
}
변환 순서는 로컬 축으로 scale → rotation → translation으로 고정합니다.
- 부모 공간 점 =
rotate(q, scale * local_point) + translation - 부모 공간 벡터 =
rotate(q, scale * local_vector) - 로컬 공간 점 =
rotate(inverse(q), parent_point - translation) / scale - 로컬 공간 벡터 =
rotate(inverse(q), parent_vector) / scale - 부모 공간 법선 =
normalize(rotate(q, local_normal / scale))
법선벡터의 경우, 벡터에 적용하는 선형변환을 그대로 적용하면 비균일 축소확대에서 법선벡터로서의 수직성질을 잃어버립니다.
대신에 법선벡터는 선형변환의 역전치행렬(ex. 선형변환 일 때, )을 적용해줘야 합니다.
- 점의 변환 순서는 위에서도 보듯이 스케일->회전->평행이동이므로, , 여기서 선형변환
- 법선에 적용해야 하는 선형변환 행렬은
- 회전행렬의 경우 이고, 스케일 행렬은 대각행렬이니
- 따라서
이렇게 되어 "부모 공간 법선 구하기"는 normalize(rotate(q, local_normal / scale))입니다.
3. Quaternion
회전을 위해 쿼터니언은 최소한으로 시작합니다.
지금은 제가 가진게 vec3클래스밖에 없어서, 별도로 double w, vec3 xyz 이렇게 실수부 허수부를 관리해봅니다.
쿼터니언 클래스가 가지는 기능은:
- identity 기본 생성자,
axis+angle로 생성 - 정규화 및 conjugate를 통한 단위 quaternion 역회전
- quaternion 곱으로 회전 합성
rotate(vec3)를 지원합니다.
기본 뼈대는:
class quaternion {
public:
  quaternion() : w(1), v(0, 0, 0) {}

private:
  double w;
  vec3 v;

  quaternion(double w, const vec3& v) : w(w), v(v) {}
};
회전하지 않는 단위 쿼터니언은 (1,0,0,0)입니다.
값 생성자를 private으로 두어 임의의 쿼터니언을 만들지 않도록 했습니다.
회전을 나타내는 쿼터니언은 회전축 , 회전각 에 대해:
static quaternion from_axis_angle(const vec3& axis, double radians) {
    if (axis.length_squared() == 0)
      throw std::invalid_argument("rotation axis must be nonzero");

    const double half_theta = radians / 2;

    return quaternion(std::cos(half_theta), unit_vector(axis)*std::sin(half_theta));
  }
이런식으로 회전축과 회전각을 주면 회전 쿼터니언을 생성해주는 스태틱 메서드(팩토리??)를 노출합니다.
역회전의 경우, 항상 단위 쿼터니언을 유지한다는 전제가 있으면 그냥 conjugate를 취하면 되는데:
quaternion inverse() const { return quaternion(w, -v); }벡터 회전은 vec3 p와 쿼터니언 q에 대해 이고
임시 쿼터니언을 만들지 않고 하려면
- 전개:
- 단위 쿼터니언 및 적용:
vec3 rotate(const vec3& p) const {
  const vec3 t = 2 * cross(v, p);
  return p + w * t + cross(v, t);
}
마지막으로, 회전 합성을 위한 쿼터니언끼리의 곱은:
두 쿼터니언 에 대해
quaternion operator*(const quaternion& rhs) const {
    const double result_w = w * rhs.w - dot(v, rhs.v);
    const vec3 result_v =
        w * rhs.v + rhs.w * v + cross(v, rhs.v);

    const double length =
        std::sqrt(result_w * result_w + result_v.length_squared());

    return quaternion(result_w / length, result_v / length);
  }
4. transformed_hittable 완성하기
몇 가지 규칙을 가정하고 넘어가자면
- 지금은 여러 transform을 하나의 로 병합하지 않습니다. 대신에 래퍼(
transformed_hittable)를 여러 개 중첩하면 그런 효과를 낼 수 있습니다. - 회전/스케일 기준점은 로컬 원점입니다. 원하는 동작과 달라질 수 있으니 이제 오브젝트에 직접
center를 지정하는 대신transform에서 평행이동시켜서 위치를 정합니다.
뼈대는:
class transformed_hittable : public hittable {
public:
  transformed_hittable(std::shared_ptr<hittable> object, const transform& local_to_parent)
      : object(object), local_to_parent(local_to_parent) {
    if (!object)
      throw std::invalid_argument("object must not be null");
  }

private:
  std::shared_ptr<hittable> object;
  transform local_to_parent;
};transformed_hittable.hit()은, 광선을 local공간으로 변환하고, 이것으로 object충돌검사를 진행하고, record는 부모 공간 기준으로 기록합니다.
bool hit(const ray& r, interval ray_t, hit_record& rec) const override {
  const ray local_ray(local_to_parent.inverse_point(r.origin()),
                      local_to_parent.inverse_vector(r.direction()));

  hit_record local_rec;
  if (!object->hit(local_ray, ray_t, local_rec))
    return false;

  // 기존 rec.normal은 이미 ray를 향하도록 뒤집혔으므로,
  // 바깥쪽 법선을 복원한 뒤 변환한다.
  const vec3 local_outward =
    local_rec.front_face ? local_rec.normal : -local_rec.normal;

  rec = local_rec;
  rec.p = r.at(rec.t);
  rec.set_face_normal(r, local_to_parent.apply_normal(local_outward));

  return true;
}
이런 식인데, 변환할 ray 방향은 정규화하지 않습니다.
우리는 계속 (ray_t 구간검사에서)t의 크기를 비교하는 중이라, 부모/자식 공간 간에 t는 유지되었으면 좋겠어요
또한 부모/자식 공간 간에 t가 유지되니 rec.p = r.at(local_rec.t)처럼 그대로 t를 써서 부모 공간 교차점을 얻어낼 수 있습니다.
또한 object->hit에서 rec.normal을 받아오고 나면, ray를 거스르는 쪽이도록 뒤집혀있습니다.
로컬공간에서의 바깥으로 나가는 법선벡터 local_outward를 얻으려면, 지금이 뒷면이면 일단 뒤집어줍니다.
그래야 나중에 또 나오는 rec.set_face_normal()에서 "법선벡터가 광선 반대쪽이니까 front_face=true다"라고 잘못 판단하는 일이 없습니다.
world.add(make_shared<transformed_hittable>(
  object, transform(center, rotation, scale)));
처음에 회전/축소변환 없이 만들었던 씬에 무작위 변환을 추가해봤습니다
